Tired of having your inbox clogged by a couple of big files?
Here's an easy way to share those files and pictures with everyone, without having Outlook choke:
What is it? Just Beam It is a VERY simple way to share files with anyone
and everyone, using Firefox, Google Chrome, or Internet Explorer.
All you do is go to justbeamit.com -- there, you'll see an interactive box:
All you need to do is one of two things: in Chrome or Firefox, open the
spot where you have the file saved and drag it into that window.
Otherwise, click on "select a file to beam" and click the file in your
directory. The app then uploads the file - up to 2 gigs in size - and
gives you a link that people can use to access it:
You just save the link, and you can send it to anyone and everyone - it
takes up no space, and those who want the file can download it...
leaving their inbox free from large files.
So... next time, don't "alloak" or "allsherood" that big file - beam the link!
Per usual, you can see all our tips on our blog - http://smstechtips.blogspot.com/
You can contact us any time, and we can come by to help you with any of our tips, or you can swing by to see us.
If you are looking for a simple way to integrate technology into your life, I highly recommend using Google Calendar. It is simple to use and much better than your old "plan book". Once you get going, you will be wondering how you ever survived without it!
In order to use Google Calendar, you must first have a Google account. Since the school district has joined "Google Apps", everyone SHOULD already have an account. The username is your school email address. Your password is the same password used for your email. If you have difficulty logging in, let us know.
The beauty of Google Calendar is that you can create multiple calendars, each with a different purpose. Each calendar can be made private or public, and it can be shared with others, allowing them to also make changes. As you can see below in my Google calendar, I have set up four different calendars (described in more detail below). The names of these calendars are viewable on the left. (By clicking on the calendar names, you can make them visible or hidden in your main calendar.) Each calendar can be assigned a different color to help you easily tell them apart. When you add a new event to Google calendar, you choose which specific calendar you would like to add it to.
My Google Calendar
My Four Calendars:
1. 8 Gold Calendar (gold) is public for anyone to see and acts as an important communication tool for our students and parents. All teachers on our team are able to add events to this calendar, such as upcoming tests, projects, due dates, etc. As you can see in the image below, this calendar is also "embedded" directly into our team website. If your team has a class website/blog/wiki, we can show you how to set this up!
2. Gold Teachers Calendar (green) is a private calendar shared just with the teachers on our team. We use this to keep track of school, department, and parent meetings. This has really helped improve communication and collaboration. Whenever one of us adds a meeting, for example, it is immediately seen in the other teachers' calendars.
3. Jeremy's Calendar (blue) is my personal, private calendar. This is how I keep track of all things outside of school. Many of you may benefit from a "family calendar" to help you keep track of your children's commitments (sports, play practice, appointments, etc.)
4. Science Calendar (private) is used as a pacing guide for my curriculum.
Our Google Calendar is embedded directly on our team's website.
Other Ideas for Using Google Calendar
Post daily homework assignments.
You can attach Google Documents to all of your events. This comes in handy for homework assignments.
If you teach more than one class, set up more than one calendar. For example, there could be a "Math/Science Homework" calendar and a "ELA/Social Studies Homework" calendar.
Use it as your plan book for the school year.
Some school districts have utilized Google Calendar to be the shell for their curriculum planning. I have not experimented with this, but it an interesting possibility.
School Calendars
Imagine how helpful it would be if there was an "Oak Middle School" or "Sherwood" calendar that could be edited by all staff! It could include upcoming events, field trips, assemblies, after school sports/club events, meeting agendas, and so much more.
Let us know if you would find this helpful. We could look into setting one up if there is enough interest.
Access your calendars from anywhere.
Once you set it up, Google Calendar can be "synced" to all of your devices. This means that you can view and edit your calendars from just about any laptop, smart phone, or tablet (such as an iPad). You can even add events on your phone.
It can be a little tricky to first set up, but it is definitely worth it. Unlike my laptop, my phone is always with me so it's great to always have access to my calendar. The image to the right shows what how your calendars would look on a smart phone.
(Advanced) If you would like to sync multiple calendars on your phone (I have all four of my calendars on my iPhone), you must open up your phone's web browser (will not work on your laptop) and go to https://www.google.com/calendar/iphoneselect. Here, you can choose which calendars you want to sync on your phone.
Google Calendar Tutorial:This tutorial explains many of basic features of Google Calendar such
as: creating new calendars, adding/deleting events, looking at
different calendar views (daily, weekly, monthly), and repeating events.
So, conference day is coming quickly - it's now a week away... and many of us are doing student-led conferences.
If you're like my team, you want to know how it goes - what's the parent perspective on the day, and what can you do better next time? Also, you know there will be parents who will want to meet with just the teachers sometime in the near future. The question is how to get information from the parents quickly and easily...
We used to have two stacks of papers - a survey and a conference request form. Parents would fill them out as needed, turn them in to the appropriate box, and then we'd take a day to sort through the information during our preps. Once we started using Google Docs, however, it seemed natural to eliminate the paper and switch to a digital format. We began experimenting with the 'create forms' option in Google Docs, and found that it works quite well for our needs:
So, on conference day, we take out a laptop cart and set up a bank of 5 or 6 laptops. We launch the web browser on them, and load the conference survey page. At each conference table, we have a basic set of instructions, which ends with a request to take a moment to fill out the survey. At the bottom of the survey page is the link for the conference request form.
What are the benefits to using this system?
No paper - we don't need to rifle through a stack of forms, or keep track of where we put them.
Results are instant - with Google Survey, we can check on results in real time - it gives handy pie charts and graphs that show the responses in real time.
Shared access: Each teacher - and anyone else that needs the information - can have instant access to it.
So, how do you do it?
In Google Docs, just click Create-->Forms. It's a simple drag and drop process... then you just save the form, click "go to live form" and you're off to the races.
But we can make it even easier:
If your team is interested, drop us a note and we can give you a copy of ours, and help you set it up. Our preps are from 11:30 to 1 pm, and we can be available to help you at bus dismissal as well. So let us know, and we can get you up and running in no time.
Most educators today will agree that YouTube contains a wealth of educational information. Unfortunately, many teachers are hesitant to show YouTube videos in class because they run the real risk of exposing students to inappropriate material. Even if you know the video itself is appropriate, you have had no control over the comments for the video or the "related videos" shown to the side... until now.
ViewPure is a great website that basically strips all of the unnecessary junk (comments, related videos, suggestions, etc.) away and just shows the video you want to watch.
To use ViewPure, copy the link of the video into the site's "purifier" and click "Create". This will create a unique link for this video free of any distractions. This link can be shared with students if you would like them to view a video from home.
To make it even easier, ViewPure's website has a "purify" button that you can drag to become a permanent part of your web browser's address bar. This button does the same function as described above without having to visit the ViewPure website. Just open a video on YouTube, then click on the "purify" button in your address bar to remove all of the extras.
Before ViewPure: Notice all of the clutter...related videos, comments, and extra information.
After ViewPure: All of the clutter is gone! There are a few links at the top which allow you to share the video with others.
Learn about the "YouTube for Schools" community! There is plenty of helpful information on why and how to use YouTube in your class. You can submit or search for content-specific "playlists" of videos. For example, check out my Chemistry Playlist. These are all of the videos I have saved that I find useful to show during my chemistry classes.
This "Free Tech 4 Teachers" blog post gives additional suggestions for removing clutter, as well as tools for cutting and remixing YouTube videos, and editing videos within YouTube itself.
I have my own YouTube channel, manage a few science playlists, and "subscribe" to authors of videos I find helpful (such as Bill Nye, Steve Spangler, and Discovery Channel). If you are interested in using YouTube more in your class and have questions about any of its features, I would be happy to help you out.
Social media has become an integral part of our students - and our own - lives. Along with this, it has become a classroom tool - many teachers have kids design fake Facebook pages to demonstrate their understanding of a fictional or historic character. Take this example for A Midsummer Night's Dream:
This profile wasn't done on Facebook, however - it was created using a template on ClassTools.net -- a very simple interface that allows anyone to create a profile page quickly and easily. The page can be saved, printed, downloaded... allowing students to focus on the content, not the layout.
You can view a brief video that explains the tool here.
While you explore Fakebook at ClassTools.net, take a look at some of their other templates --
Post It allows you to upload any image and turn it into a label-type quiz, useful for any time you need kids to learn the parts of something - regions of a country, anatomy, elements of a structure, etc.
Telescopic Topic lets you import any outline / bullet point list and make it collapsible - so students only see the main topics, then can click on them to get more information / detail, and even add in new facts as they learn them. This could be useful for outlining a paper, letting students see just the main ideas and how they relate to one another, and then revealing details and analysis that support each point.
Beyond this, they have all the usuals - venn diagrams, fishbone, hamburger... even a plagiarism checker for essays.
The site has a number of great templates -- give it a look, and give some a try!
Do you make double-sided copies when you photocopy assignments for your students? If not, you should!
As Oak and Sherwood both attempt to limit paper consumption for communication and assignment purposes, we have a responsibility to consume only what we need. Making double-sided copies conserves paper. I know many teachers who cringe at the sight of a packet being copied with only one side being used. If you do only need one side, you can encourage students to use the other side as scrap paper, a drawing, or some reflection.
While I am not sure about the printers at Sherwood, many of the Oak printers are capable of printing on both sides of the paper. This is especially helpful if you need to print multiple pages. If you are unsure how to do this, follow these steps below. I have also attached a screen shot of the printing menu for your convenience.
1. Open up the document of your choice and click “Print”.
2. When the printer window pops up, click where it says “Copies and Pages”.
3. Choose “Layout”.
4. Next to where it says “Two-Sided”, choose “Long-Edge Binding”.
Looking for a new way for kids to show what they know? Check out the web 2.0 tool "Museum Box"
What is it? Well, here's how the site describes it: "This site provides the tools for you to build up an argument or
description of an event, person or historical period by placing items in
a virtual box. What items, for example, would you put in a box to
describe your life; the life of a Victorian Servant or Roman soldier; or
to show that slavery was wrong and unnecessary? You can display
anything from a text file to a movie. You can also view and comment on
the museum boxes submitted by others."
The
student can attach videos, their own documents, images, powerpoints,
audio files, links... all of which can be played / viewed by whomever
looks inside the virtual box.
Here's one example of a single cube:
These boxes can be arranged in a drawer of related cubes. Consider this one on the industrial revolution:
Each
cube explores one facet of the revolution, including a variety of media
and text files that demonstrate what the child knows. Here's one excellent example of what a museum box can do.
Educators can set up a free account and then set up
simple registrations for their students (you can even do a bulk upload
of IDs and passwords in an Excel file - just create a spreadsheet
following the instructions on the teacher page of
the site, and all your kids can be set up at once. They can then
create cubes and submit them for your comments and approval.
How can these be used, beyond the history classroom?
In
ELA, they would make a nice option for exploring a character or
literary concept - say, a cube focusing on the symbolism of stars in
Under the Persimmon Tree...
In social studies, there are TONS of examples on the site - a drawer
focusing on a country being studied in Africa, where one cube focuses
on food, another on climate, a third on clothing, etc.
For world
languages, a cube can demonstrate understanding of key vocabulary
words: with sides showing images displaying their names in English and
the target language, an audio sample of the student speaking, and even a
paragraph of written text...
The uses are many and varied - take a few minutes to explore
the site, and see what some other educators have done with this
interesting little online tool...
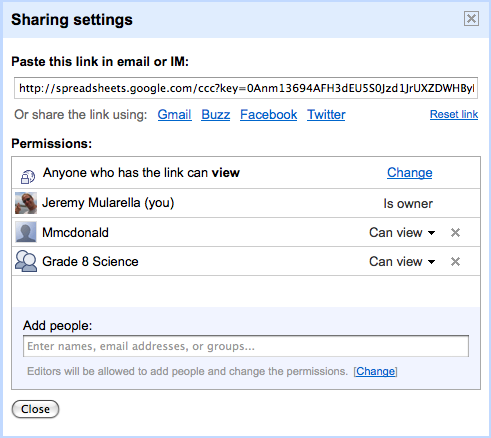
More and more teams at Oak and Sherwood are adopting a student-led conference model compared to the traditional teacher-parent conference. One of the big advantages to this format is the ability to meet more of the parents. In order to accommodate everyone, we have parents sign up for a fifteen minute time slot while they are visiting our classrooms on Curriculum Night. There are four openings for parents per time slot. If you would like access to the spreadsheet, please email us.
After Curriculum Night, we recorded the last name of each student and their time slot into a Google Spreadsheet. This document is shared with team members and made viewable to anyone who has access to the link.
How this helps us
Administration, Allied arts teachers, and Foreign Language teachers all have access to our Conference Day schedule. They know when to stop by if/when they need to speak with a student and his/her parents.
Parents who signed up for a time slot can confirm that time. If they realize there is a conflict, they can change.
Parents who were unable to attend Curriculum Night can see which time slots are still available. They can send an email to the team and request a meeting time. Once we "pencil in" a parent for a particular time slot, all other parents can see that time slot is no longer available.
Please leave a comment with any suggestions you have regarding student-led conferences.
Do you have another system for scheduling parents?
Does your team use technology during the conferences?
Any other suggestions for using Google Spreadsheets?
How many passwords do you have to remember? Between school sites, various home bill and credit card sites (not to mention fantasy football leagues) most of us have well over a dozen passwords to remember... Many people cycle through the same couple ones, depending on the site.
How often have you forgotten a password?
Here’s a simple way to keep all your passwords random – difficult to hack – yet easy to remember:
Choose a word with a capital letter, and a random number. This becomes the base for all your passwords. Between the word and the number, insert the initials of the site or service.
For example, if you chose “Firetruck 284” your password for Verizon would be FiretruckV284...for Xfinity it would be FiretruckX284. Simple to remember – a word and number – but different for every site. The mix of characters – letters and numbers, capital and lower case, keeps it random enough to protect your identity.
Managing your passwords
If you already use numerous passwords and have trouble remembering them all, there are numerous applications for computers and smart phones that help you manage all of this important information. I use an app called Msecure that can be used on a Mac/PC and any Android or iOS device (iPhone, iPod touch, or iPad). It does cost money ($7), but I use it to manage all of my passwords, usernames, credit card information, membership numbers, and just about anything else I ever need. Another option is to make a file or an entire folder on your computer password-protected so only you can access it.
Have you ever gotten to school, only to find your flash drive is sitting at home, or the file you thought you saved on your school system was saved somewhere else? With this tool, that will never happen again...
Dropboxis a file sync and storage system that allows you to keep files in sync across multiple computers and backed up on their servers. When you register for a free account and install the program, it creates a folder on your computer. This folder is like any other folder on your system - you can store files in it, open them, save them, etc. The difference is that the items you save in that folder are being saved remotely - on the Dropbox site, not your computer.
With this program installed, you can access files on multiple devices at any time. (There are Dropbox apps for iPhone, iPad, Android, and Blackberry.) Once a file is updated on one device, it automatically gets synced on all other devices.
You can also share specific files or entire folders in your Dropbox with other users -- allowing you to get files to those who need them, without worrying about an email attachment being too large. The site gives 2 gigabytes free, and another 250 MB for each person who references you when they sign up - they also get an additional 250 for using the referral. The short video below explains the basics of this tool.
Benefits to Using Dropbox:
Back up all of your important documents. They used to say "Back up everything to the server", but this was time consuming and only accessible from within school. Dropbox automatically backs up everything without you having to worry about it. It also keeps track of deleted files. These can be restored later on.
Undo mistakes. Dropbox saves not just your file, but each earlier version that you saved. So, if you accidentally deleted a paragraph or slide, etc., you can go back to a previous version.
Keep your files organized on different computers. Many teachers use their school laptops in addition to another home computer, tablet, or smart phone so it can be tough keeping everything organized. Since Dropbox keeps all of your devices in sync with each other, you are more organized.
Collaborate using shared folders. We have a shared "8 Gold" folder that includes student schedules, calendars, and "beginning of year" forms. If someone edits a document, the changes are updated for all of us. Derek and I have another shared folder for the school yearbook.
The first week of school is always exciting as I attempt to learn the names of my 100+ middle school students while attempting to teach them our team's expectations for the year. We make an effort to get to know every student and spend some time on team-building activities. In years past, each teacher also had students fill out a questionnaire in class. They were all similar so the students ended up writing the same responses four times. We would read them once then throw them in our desk where they stayed for the rest of the year. We rarely shared responses with each other.
This year, we combined our questionnaires into a single form using Google Docs. There were personal questions, academic questions, and even questions about their use of technology and social media. As soon as student were finished, we spent time together during our prep time reviewing their responses. Depending on the type of question, we could see graphic representations of the summary of their responses. For example, you can see above that Science is their overall favorite subject in school! You can view our student survey here and see the types of questions we asked. We received excellent data overall that will definitely shape our teaching this year! If you would like a copy of this form to modify and use in your classroom, email me and I'll share the document with you.
I am also relying on Google Docs more this year to communicate and collaborate with my students. I created a "plan book" document where I will be writing summaries of my lessons. It also includes the benchmark for the day and the homework.
I have also created a shared folder in Google Docs I called "Science Docs". This folder is "public on the web" so anyone can find it and view it. I provided the students the URL for this shared folder on my team's website. Within this folder, I am creating subfolders for all of my different science units such as "Properties of Matter". It is my goal to either create all documents within Google Docs itself or at least upload the files to share in these folders. This way, students will be able to view, download, and print all of my class handouts from this one location if they are out sick or lose the original copy.
In my last few posts, I have explained some of the benefits to using various Google apps in the classroom: Google Docs, Google Calendar, Blogger, and Google Reader. I'm hoping it has become a little more clear why more and more schools are embracing these apps.
In August, Maryland joined Oregon, Iowa, and Colorado to adopt Google Apps for Education on the state level. Every public and private school district, as well as public and private colleges/universities in those states will now be using Google apps in their schools! Many other school districts around the globe have also "Gone Google" on their own. I do predict that my own district will go to cloud computing in the next five years if not sooner.
As great as all of these apps are, it can be tough to keep everything organized. This is where iGoogle comes in! This personalized Google homepage allows you to add many different "gadgets" and rearrange them so you can access all of your important information quickly and easily. You can also add a theme to the page, letting your personality come through. The video below gives a quick tutorial on how this would look.
As you can see in the video, you can add all sorts of information ranging from horoscopes and sport scores to news headlines and the weather. The key gadgets I recommend adding are all of those Google tools: Gmail (to see if you have email), Google Reader (to see if you have new blog posts to read) , and Google Calendar (to see what's coming up in the next few days). The image below is a screen shot of my iGoogle page.
As you can tell, I am obviously a Steelers fan! Also, you will notice my Google Calendar and Google Reader to the right. I just finished reading everything so it tells me I have nothing new to read. I also have the Google News gadget which gives me a nice selection of headlines. I usually have my Gmail gadget right at the top, but I moved it for the screen shot for privacy reasons. What you can't see is that I have numerous other gadgets when I scroll down (listed to the left) that give me more science/technology headlines as well as some bargain websites.
My Recommendations
I feel strongly that everyone should set iGoogle to be their "homepage". In other words, when I open up my web browser of choice, it automatically goes to iGoogle. I know of many people who use a default Google search screen or maybe the website of their school for their home page, and it's just not an efficient way of gathering information online.
Ideas for Using iGoogle
Ditch the desk calendar
There is no need to have a paper calendar taking up space on your teacher desk when you have a laptop. Whenever you go online, you can see upcoming events on your Google Calendar gadget.
Encourage students to use iGoogle to keep themselves organized with school
Even if you have a team Google Calendar online, students must still go to the website to look at the calendar. This takes effort. With an iGoogle homepage, the calendar is there staring them in the face each time they go online (which as we know, is quite often).
Students can change gadgets as needed throughout the year for different units or projects.
Increase communication and collaboration among students
iGoogle (and Gmail) has a built-in chat feature. Students can chat with each other and collaborate over homework assignments.
If teachers are online and make themselves visible to their students, students could chat with them as well with questions they may have.
The term Web 2.0 was first used in 1999 by Darcy DiNucci in her "Fragmented Future" article, but it did not become popular until 2004 when O'Reilly Media hosted the world' first Web 2.0 Conference. In the early phases of the World Wide Web, the user experience was very one-directional. We visited websites and read information. There was no opportunity for most people to write information unless they were skilled with HTML coding and web design. This era is now known as Web 1.0
Web 2.0 can also be referred to as the Read/Write Web. The Internet today is very different than it was ten years. Now, it is very easy for anyone to both read and write information online. This can be done in numerous ways ranging from Twitter and Facebook to commenting on news websites. Nothing quite says "read/write" like blogging though. Blogs (or weblogs) are similar to a website that is created and maintained by an individual or small group of people. These blogs typically have a focused topic and audience in mind and can be on just about anything ranging from scrapbooking to video games to education.
In order to be considered a true blog though, it must be a Web 2.0 experience. Others can "follow" or "subscribe" to blogs, post comments, and can share posts via Facebook, Twitter, or email to friends. Instead of a static blog, it becomes more of a community where information gets shared back and forth numerous ways. As the author of a blog, you should provide links throughout your posts so your readers can follow those links and get more information.
There are many popular blogging platforms out there aimed at teachers and students including Edublogs and 21Classes, but I choose to use Google's Blogger site. All three of these options have their differences, and I suggest you explore all three. Edublogs and 21Classes are probably the better options if you plan on having students set up their own individual blogs. Both of those sites have free basic plans with upgradeable options. I choose Blogger because it's very intuitive for me and, being part of Google, is easily integrated into my other Google apps such as Google Docs.
Ideas for blogging
Establish a reflective teacher blog.
This is the intention for this blog. I will be reflecting about my practices and use of technology throughout the school year.
Create a class blog.
The blog can be used as a class/team website with posted homework and curriculum links.
Many teachers who are not tech savvy use blogs in this manner. Students can reply to your posts or students can even be allowed to create their own posts.
You can have different pages for different subjects or links. It is relatively easy to embed pictures, videos, or even a Google Calendar.
There is a growing trend in education to have students create online portfolios of their work throughout the year using blogs, websites, Google Apps, or some other presentation format.
This is a great way of using technology to build upon formative assessments and something I am considering for the future!
Create a blog for a specific project.
Set up the blog for a particular science project or maybe an ELA book students will be reading.
Students can then post their results or analyze the theme of the book via blog posts. The best part about this is that other students can then read and comment on the writing of their peers.
Google Docs allows you to create documents, spreadsheets, and presentations online. These files can be created from scratch, created from an online template, or you can upload existing files in their native format. The idea is simple: rather than emailing files back and forth to numerous people, have those people edit the SAME document online. Everyone stays on the same page and can see edits made by their peers. It's genius! Their Google Docs in Plain English YouTube video explains this more clearly.
The main selling point to why someone would use Google Docs compared with Microsoft Office is its collaboration features. As the owner of a document, you can choose how to "share" it. There are three options by default:
Public on the web: Anyone can search for and find the document (no sign-in required)
Anyone with the link: You can share the link to a document on a website or with a certain group of people via email or chat (no sign-in required)
Private: Only people explicitly granted permission can view the document (sign-in required)
Once you have decided who you want to view this doc, you then decide who has editing capabilities. Say you share a spreadsheet with ten people, you may only want two of them to be able to edit whereas the rest can view only. There is also an option where you can allow anyone to edit (no sign-in required). I have yet to find a purpose for this though.
Most of my teaching documents are public to some extent, but I only allow other science or team teachers to edit my docs. The exceptions would be personal docs or teaching-related docs that include private information such as test material or student grades.
The other great thing about storing these documents in the "cloud" is that they can never be accidentally lost. Say goodbye to the days of students forgetting their flash drives, leaving a report at home, printer running out of ink, etc. They can either share their documents with the teacher or at the very least access them at school via the Internet.
Over the course of the one year that I have been using Google Docs (I currently have 100 documents stored in their cloud), the improvements have been solid and often. I feel they really do pay attention to customer feedback and are dedicated to making this service stronger. The embedded video below shows some of these improvements.
Ideas for using Google Docs:
Use Google Documents to plan our team meeting agendas and write up our parent newsletters. Teachers on our team would add agenda items and class updates ahead of time so our meetings were more productive. We would then copy and paste the parent updates into an email which the ELA teacher would then zip off to all of the team parents. We would use the same file each time and change it to reflect what was new. This year, I plan on making different docs each time, and then having a link on our team website to the newsletter archives for parents.
Communicate with non-English speaking parents. Google announced just last week that all Google Docs can now be translated into one of 53 different languages!
Make Google Document lessons public and viewable for students. This includes handouts, homework assignments, and all Google Presentations. I uploaded all of my PowerPoint presentations and while they may not convert perfectly (especially if you have animations or transitions) it is very helpful for students to use for reviewing for a test.
Have students share assignments with you and other students. I only utilized this during my science fair project. Students shared a document with their partners and a few shared their ongoing lab report with me so I could give ongoing feedback. I do know that Mr. Pizzuto (ELA teacher) collaborated more with students due to the larger number of long term writing assignments he assigned.
Use Google Spreadsheets for my student grade book. While their Spreadsheets cannot do everything that Excel can, it's getting close. The pros far outweigh the cons. I have instant access to all of my students' grades from any computer without having to worry about losing my paper grade bookor Excel grades should my laptop crash. For this school year, I also plan on creating a spreadsheet for my plan book. Students will have
Use Google Forms to create surveys for students and parents. This ranged from getting parent feedback on our student-led conferences to finding out a good date for our team hike.
These can also be used to make short little quizzes for students. I also used it as my beginning of the year "getting to know you" survey for students. It gave us a lot of great information we were able to revisit throughout the year. Regardless of how its used, you can access a "summary of responses" to get instant feedback. This event creates an appropriate graph depending on the format of your question. See an example below.
I have found myself using Google Docs more and more over the last year. However, I am not ready to totally quit using Microsoft Office either. As great as it is, Google Docs still does not quite have the formatting capabilities of its software counterpart. The good news is that if I have a document, or even a pdf file, I can upload it to my Google Docs withoutreformatting them. This lets me share the doc and keeps it looking exactly as you want it, but this also means you will not be able to edit it online.
As I said in my earlier post, I feel that in another year or two of updates and improvements, I will be ready to fully adopt this as my editing suite. I am confident it will be just as good if not better than anything else on the market. Let's just hope it stays free!
Early last summer, when I began to research emerging technologies to use in the classroom, I signed up for a free Google account. I had long grown tired of my Yahoo email client and Gmail drew me in. I had never used any Google applications other than just their basic search engine, but that was all about to change.
Once I became comfortable using Gmail (which I absolutely love by the way), I began to explore other Google apps that would benefit me in the classroom. You could spend days just reading on all of the different tools Google offers, but I chose to focus on learning just a few: Google Docs, Google Calendar, Google Reader, and Blogger.
Over the past year, I have learned a lot by using these apps in both my personal and professional life. In order to give you a sense on just how valuable each of these has proven to be, I will be writing a separate blog post on each.
I would like to point out that I have been using these Google apps to collaborate with a relatively small subset of teachers and students. I am hoping this will continue to expand to include at least a majority of teachers in my building. Somewhere down the line, I hope to speak with our IT Director to consider looking into Google Apps for Education. This is a FREE suite of communication and collaboration tools that is meant to replace expensive software-driven Microsoft applications. Each student and faculty is given access to Gmail for their email client (much better than Entourage!) as well as Google Docs, Google Calendar, Google Wave, Google Sites, Google Video, and Google Groups. In May, Google announced that other apps including Blogger, Google Reader, iGoogle, and YouTube would be integrated into the Google Apps for Education suite this Fall as well.
While I do think this is where many schools are heading, I admit that I am not quite there yet. Give me Gmail and Google Calendar now, but as I'll explain in my next post why I'm not quite ready to abandon my Microsoft Office suite for Google Docs. Give me another year or two, and I'll be "all in."
Before I ease my students into using a science notebook, I am scaffolding the process for them. Our first inquiry investigation involved finding out the density of water. I provided the focus question for them (which I realize is not ideal in true inquiry), but let the groups identify the variables involved and design their own experiments. Student groups measured the mass for different volumes of water.
This was all standard for my class and nothing new. However, their measured data used to stay within each group. On this day, all data was shared via a class data table and graph. Students could see the results of everyone. We discussed class trends and explanations for possible outliers. This made the data more meaningful.
One of the key concepts in an inquiry investigation is the use of claims and evidence. Once all groups recorded their data on the board, students made claims and used the class data as the evidence to back up the claim. Just like in a court case, a claim is meaningless unless you have the evidence to back it up. Students can use their own data as evidence or the data from anyone else in the class. Depending when you reach this point, students could also use evidence found in a textbook or another activity.
While the conclusions and reflections students generated were really good, this idea of claims and evidence is what I found the most beneficial. It really makes them take a solid look at the results and whether they had meaningful data or not. It also helps that the ELA teacher on my team also teaches the students that they need specific textual evidence when analyzing a passage in a book so they are hearing the same message in two very different contexts!