Monday, September 24, 2012

Improve your tech skills with free guides


Looking to get better at using some of the tools you already have on your system, or looking to explore how to use something like Evernote or Dropbox?  Then hop on over to....


This handy tech site offers some very good material to help you make better use of the technology you have.  Here's what they offer:

Pages dedicated to recommended apps and plugins, sorted by the type of device - looking for add-ons for your browser?  apps for your IPhone or IPad, or Android?  They post what they see as the most productive / interesting, sorted into categories for each device.

 They also have free guides to popular tools, programs, and devices... including the three you see below.  Looking to refine your web browser to make it faster, or get better at Photoshop or Office?  They have downloadable manuals in PDF form.


They also have some handy, printable cheat sheets that you can use to get better at using specific apps and programs, like this Google Doc Cheatsheet - it gives you keyboard shortcuts that can make you a bit more efficient when navigating through the menus.


It is free to register on the site, and they don't charge for any of their items -- in fact, just enter the password "makeuseof" - not terribly clever, I know - and all of their content is at your fingertips!


Per usual, visit our blog for details on all of our tips, and let us know if you have any questions or need help with anything.  See something you think we should share?  Let us know!

Deremy


Sunday, September 16, 2012

Google Drive: Keeps Getting Better

Google Drive (formerly known as Google Docs) is an excellent online productivity suite comparable to Microsoft Office. The desktop web version features real-time editing among numerous collaborators, comments, various sharing settings, and more. Last year, a mega face lift included "Dropbox-esque" features that lets you sync all types of files across all of your devices.

They introduced a much-hyped iOS app that hinted to these same features. Unfortunately, it only allowed you to view documents. No editing, no sharing, and no collaborating... until now.

I currently have the Google Drive program downloaded on my school laptop and home PC. I also have the app installed on my iPhone and iPad. Just like Dropbox, this creates a folder on your desktop that contains all of your files that were previously only accessible online. You can store ANY file in Google Drive including Microsoft Office documents, PDFs, photos and videos. It also lets you view all of the native Google Drive files including Google documents, spreadsheets, forms, and presentations. However, if you wish to view these, it takes you to the web version.

What is Google Drive good for?

Student Workflow

The Sherwood iPad pilot team (6 White) wrote an EXCELLENT iBook called Teacher's Guide to the iPad Classroom. One of the major themes in this resource is workflow. There is no perfect answer as teachers try to answer these two questions:
  1. How should we send resources out to students? 
  2. Even more challenging... how do we get students to share their completed work back with us?  
In the ever-evolving world of technology, it's possible these questions will never have a definite answer. However, I know of at least a few teachers (myself included) who are currently using Google Drive as an answer to the first question. For example, I have a folder in Google Drive called 8 Gold Science Docs. Students can access this folder from our team website and find all of the handouts from class. This year, I am making sure all resources are in the PDF format. (This will help me get prepare for next year when all students have an iPad. Plus, I have found programs that let students annotate and type on PDFs using an iPad, Mac laptop, or PC.) In addition to annotating handouts digitally, students can download and print them as well.

This year, with the addition of student Google accounts, I decided to share my Science Docs folder with every student individually. This makes it even easier for the students to access my handouts. This is especially true for those students with the Google Drive app installed on their iPad.

As you can see in the image to the right, the iOS has a tab on the left that lets students quickly see items shared with them. Whenever these students get a handout in class, they can quickly open the Google Drive app, find the PDF, and open it up in their PDF editing app of choice such as Notability or Adobe Reader (my preference).


Editing Documents

As I mentioned, the initial release of the iOS app for Google Drive had limited functionality. All you could do was view files. There was a recent update which now includes the editing of documents! Here are some of the highlights to this new update: 
  • Edit Google documents with formatting options such as bold text, alignment, etc.
  • Create new documents and folders
  • Real-time collaboration with multiple editors -- just like in the web version!
  • Upload pictures and videos directly from your iPhone or iPad
White this update is definitely a step in the right direction, it is still lacking a few important features. While you can edit documents, the app does NOT currently support the use of tables. Also, you cannot edit Google spreadsheets, forms, or presentations at this time (though these features are all promised to be on the way in the near future!) So, what does this mean? If all you want students to do is write with text and share their work with your or their peers, you should be in great shape. If you rely on documents with tables, spreadsheets, and presentations, you have a little longer to wait. (The video below gives you a glimpse of what spreadsheet editing will soon look like.)


Thursday, September 13, 2012

Check homework on your IPad!

Up until this year, I carried around a clipboard of class record sheets to check homework.  Given that the IPad is a bit smaller than a clipboard, it occurred to me that - just maybe - I could find a better way to do my quick homework scores as I walk around a room.  I searched for the right app and, after hunting through five different ones, lo and behold, I ended up right next door to where I started:  PowerSchool.

It turns out that Pearson, the makers of PowerSchool, have a couple different apps with different purposes -- we all have the basic Powerschool one on our systems, and use it to take attendance each morning.  The second one, however, is great for checking homework, making comments, and having student info / pictures at our fingertips when we need them.  Interested?  Read on!

Pearson PowerTeacher Mobile  syncs right with your regular powerschool account.  Once you download it, you simply tell it your district, and then select your school.  From there, you log in like you do from any other computer.  (Note that, if you're logged in to PowerSchool on your laptop, it'll warn you that another session is running on the same account, and you need to terminate that before starting a new one).


So, what can you do with this that you can't do with the other app?


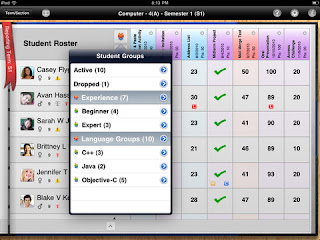
Create class groups.  You'll have the same lists of students that you see in PowerSchool - just click the Term / Section button at the top right, and select the list of students.
    • Once you're in the master list, click the little orange people icon ("groups") and you can create a set (for a class) and then groups (sub sections in the class - for times when you have your class in smaller groups, if you wish.  To add kids to a set or group, you just click their names, and they're in.


Have student photos, home phone numbers, and other information at your fingertips!  Click on a student, and get the information then and there.


The strongest features involve recording assignments.  You can enter assignments straight into the app - just by clicking on the little notebook / pen symbol under the group icon, and then hit the little "+" in the corner.  If you enter one while in your master student list, it will appear in all of your classes.  When you enter it, you can set the title, date, type of assignment (hw / quiz / test, etc.), a description, and how many points it is worth.  For example, I set my homeworks on a 3 point scale - 3=thorough / 2=done / 1=incomplete / or zero.


Once your assignment is in, checking them off in class is a breeze.  You simply tap the box next to the student, and a window opens up where you can tap the score.  Tap another kid, and move onto that one.  The real beauty here is a couple features that really make checking easy:
  • Click the comment tab and you can put in a note - left in locker, left 2 qs blank, excellent overall, etc.
  • Click attributes and you can check for late / missing / exempt / collected.  For example, if you just want to record that something is in, "collected" places a check mark in the box instead of a score.

One tip that really speeds things up is the "Fill Scores" option when you click on an assignment in the gradebook.  Here, you can - just like in PowerSchool - fill all the blank boxes with a score or a checkmark.  I use this to speed up homework checking in class:  When I walk around, I only note those that are exceptional ("3"), incomplete ("1") not done at all (0), or absent (I use the "missing" tag for this).  Then, at the end of the day, I just go to my master list and auto-fill all the rest.


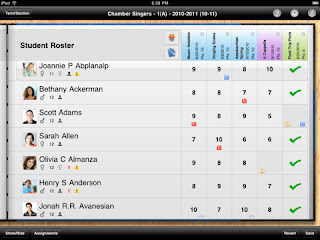
Once scores are in, you can easily see where you've put comments or attributes - just scan down the gradebook and look for the little colored boxes beneath their scores.  You can then click there to see what you wrote, or amend it at any time.


Give this app a try - it has sped up our homework checking, and kept all our notations and grades in one easy place, synced directly with our main accounts that can be accessed from any computer.  

If you need any help, or have any questions - let us know!

Derek & Jeremy