Wednesday, April 17, 2013

Finding, Curating, and Sharing Open Educational Resources

We have all heard about the future of "21st century" education: student-centered, project-based, technology-based, and more "authentic" learning experiences. One of the best models of this future is the Science Leadership Academy (SLA) in Philadelphia, PA. Chris Lehmann is the founding principal of this progressive science and technology high school. He is quite the insightful leader and once said, "Technology must be ubiquitous, necessary and invisible." (Click on the links to read more.)

As we move toward the future and implement more technology into our planning, instruction, and assessment, it is important to keep this in mind. One of the biggest hurdles for teachers is finding educational resources online. With the introduction of the iPad and other tablets, the initial focus was on interactive textbooks created by publishers. These "ebooks" are cool and flashy but very expensive. The next phase was for teachers to create their own digital textbooks. This can be done but is also very time consuming. Considering we are all in the process of implementing the Common Core and new science standards, the content of these books is also very much in flux and subject to change. The current trend is to use OER - "Open Educational Resources". The "open" implies free resources that can be used by educators and shared with their students. 


The next few tech tips will go more in depth and suggest possible methods for each step:


  1. Finding open educational resources 
  2. Curating and sharing these resources 

Wednesday, February 20, 2013

What's on your iPad home screen?

While reading through my RSS feeds the other day, I came across an interesting blog post by Justin Reich at EdTechTeacher called All the Good Apps Fit on One Screen. One of his focal points was that teachers have a core set of apps that we use the most. All of these core apps should fit on just your iPad's home screen.

Justin (@bjfr) took a screen shot of his home screen and shared this image on Twitter. He then encouraged others to do the same, using the hast tag #onescreen. For those of you who know Derek and I, you know that neither of us like Twitter. However, this was the first time I found a reason to actually engage in a Twitter feed. I began by clicking on the hash tag link above and lurked around for a while, looking at all of the images other teachers have shared of their home screens. I then took the plunge and tweeted out a pic of my own home screen and added to the conversation. A short time later, Justin Reich retweeted my comment on his own feed. I gotta say, I'm not quire ready to embrace Twitter just yet, but this did give me a snapshot into how it could be a valuable tool for collaboration.

This experience inspired me to initiate similar collaboration here in Shrewsbury. Since very few of us use Twitter, I created a Google Presentation that is public and can be edited by anyone. I am asking as many teachers as possible to take a screen shot of your iPad home screen, then share that image onto the Google Presentation for others to see. There are directions in the presentation itself, but I would also like for you to add your name, grade, and subject taught. Access the Google presentation here. Please remember that anyone can edit this slideshow so please only edit one slide. Do not edit another slide that was already created. 

Now, this isn't just for teachers. Even though some apps will vary based on grade and subject, there are many apps that can be useful to everyone. Therefore, I encourage everyone who sees this to participate: teachers, aides, curriculum coordinators, principals, and other administration. Even if you happen to be reading this and are not affiliated with Shrewsbury Public Schools, we would love your participation. If a lot of people get involved, this could be a great starting point to finding out about some new apps.

The images shared can be viewed in the embedded slideshow below. Click on the "full screen" button at the bottom to view the presentation in full screen mode.


Monday, February 18, 2013

Crash Course: History and Science Videos

John and Hank Green are two brothers from Montana who started an educational YouTube channel one year ago called "Crash Course". Most of their videos are around 9-12 minutes in length and focus on specific topics related to one of their six main courses: World History, US History, English Literature, Biology, Ecology, and Chemistry. The videos are entertaining and informative.

John Green produces the history and literature segments while his brother Hank focuses on science. Hank recently announced that would be starting a new course on Chemistry. The first Chemistry video was released one week ago. It focuses on the atom's nucleus and already has over 120,000 views!

World History Highlights: 

  • Rise and fall of the Roman Empire
  • Five pillars of Islam
  • Dark Ages
  • Renaissance
  • Capitalism, Socialism, and Imperialism

English Literature Highlights

  • Romeo and Juliet
  • Great Gatsby
  • Catcher in the Rye

US History Highlights

  • Colonizing America
  • Natives and the English
  • Natives and the Spaniards
  • More to come...

Biology Highlights

  • Animal and Plant cells
  • Photosynthesis
  • Heredity
  • Mitosis and Meiosis
  • Evolution/Natural selection
  • Human systems (muscular, digestive, etc.)

Ecology Highlights

  • History of life on Earth
  • Community Ecology
  • Ecosystem Ecology
  • Ecological Succession

Chemistry Highlights

  • The Nucleus
  • More to come...


How can these videos help you? 

We all know that any educational video is going to be aimed at a certain audience. After having watched numerous Crash Course videos, I would say their target audience is high school students and older. Younger students can definitely understand the material presented and find it entertaining, but I would give some of their content a PG-13 rating.

These videos are great for you all to watch. The two brothers do a great job of making the information entertaining and interesting. I would recommend them if you would like to review some material or maybe learn more about a new topic. However, you should screen the video first before showing it to students. Most are okay, but some can be a little inappropriate for younger students.

Personally, I am very excited about their upcoming Chemistry course. The first video (embedded above) on the atomic nucleus is excellent. It is relevant, appropriate, and gives a great overview of important concepts my students need to know.

Sunday, February 3, 2013

Organize all of the tasks in your life with Any.Do


Teachers are very busy these days. We have over-sized classes which means more students to help, more tests to grade, more parents to keep in touch with, and, well, you get the idea. This means that now, more than ever, we are multitasking like never before. I feel like I have a lot more on my plate right now, and it's difficult to keep track of everything I need to get done. The answer? A "To Do" task manager!


Why do you need a "To-Do" Manager?

I use Google Calendar quite a bit for all of the events in my life. It helps me keep track of all school meetings, hockey games, appointments, and so on. It is essential for letting me know what's going on each day and where I need to be. However, it's not so helpful with reminding me of what I need to get done on a daily basis. That's where the idea of a "To-Do" or "task" manager comes in. There are endless apps out there for iPhones, iPads, and Android phones that do this for you. Many of them are very basic, such as the "Reminders" app that comes installed on all Apple devices. There are some though that are much more helpful.

Any.Do is a free app available for the iPhone/iPod Touch and all Android phones. Unfortunately, it is not yet supported on iPads. I delayed writing this post in hopes they would update the app to include iPads. It is a popular request on their website, but this feature doesn't seem to be coming anytime soon. There is also an app for Google Chrome for your computer.

5 reasons why Any.Do is the best app out there


1. Choose your background.

There are two design background to choose from: white or black. Both are clean and sleek.


2. Organize tasks by date and/or folder.

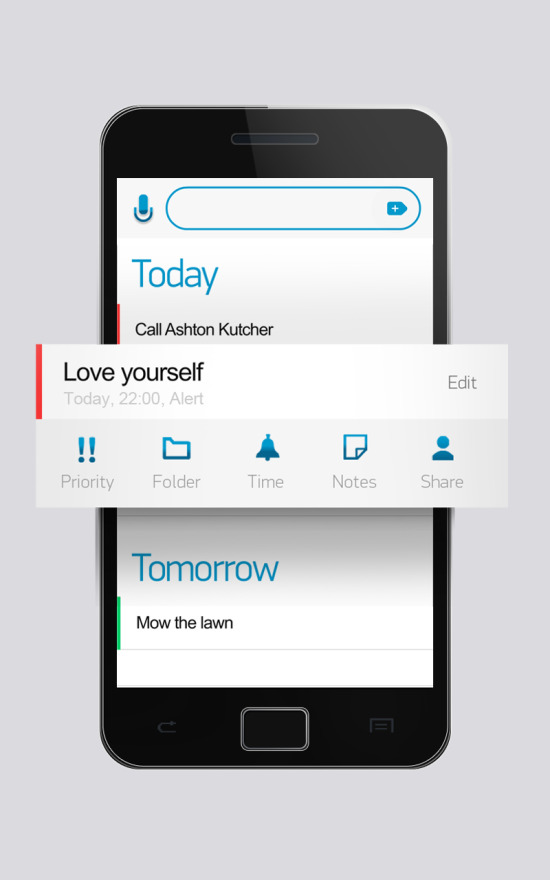
My favorite part of Any.Do is that all tasks can be organized by date and folder. For date, you decide when the task must be completed: "Today", "Tomorrow", "Upcoming", or "Later". If you hold the phone in landscape mode, it will display a calendar that lets you assign tasks to specific days. You can also create many folders to sort tasks by category. The folders I use are called "Personal", "School", and "Groceries". 


3. Intuitive touch gestures.

Any.Do is very intuitive and easy to use. Press down and hold on a task, and you will be able to move it to another spot. In the image below, let's say you decided not to buy twelve tomatoes today, simply move it to another time. When you first enter a task, it may end up in the wrong folder. No problem, just move it to the the correct one! 


4. Easy input of tasks

You can add tasks using two different methods: type them into the box at the top of the screen or click on the microphone and say it out loud. When typing, it tries to figure out what you want to do. If you just type "eggs" for example, it will try to guess the rest. Some options include "buy eggs", "egg noodles", "egg whites", and "egg nog". The voice recognition is excellent and almost always enters it correctly.


5. Some pretty advanced features

Any.Do has a great design. It's simple and intuitive to meet just about everyone's needs. However, there are some other features that really put the icing onto the cake. You can give tasks a high priority and add notes to each task (which also supports verbal entry). The two coolest features though are the reminders and sharing. You can share tasks with others by entering their email address. If they are an Any.Do user, it will appear on their phone as a shared task. Right now, you can get a time-based reminder. This will send you an alert on the date and time you choose. A new feature that will be coming soon is location-based reminders. Using the GPS on your phone, you can "tag" locations as your Home, Work, etc. You could set up a reminder to finish photocopying the tests once you arrive at your school.


Final thoughts...

Students with iPhones, iPod Touches, and Android phones could potentially use this to help themselves stay up to date with assignments. I know many teams use MyHomework for this reason. I have never used it and am curious how the two compare. However, I think the app would be the most helpful for teachers right now.I strongly recommend you give it a shot. I spent a lot of time looking at websites, online reviews, and trolling through the App Store. Everywhere I look, they either say this app is the very best or at least put it in the top 3. The company behind Any.Do has received a lot of money from investors, and I see it only getting better in the future.

If you are looking for a task manager on your iPad, the next best choice is probably another free app called Wunderlist. It is cross platform and supported on practically every device. To use the standards-based grading analogy......if Any.Do is a "4", then Wunderlist is a "3".

Any.Do Links and Resources

Download Any.Do from the:


Any.Do website
Lifehacker: Any.Do is a crazy intuitive, gesture-based to-do app
The Next Web: Create "Any.Do" tasks from your Gmail account

Tuesday, January 29, 2013

Google Drive on the IPad: App vs Browser


Using Google Drive on the IPad can be a bit confusing -- there are several different ways to access it, and each has its own pluses and negatives.  After searching the web for a basic guide that could walk me through the App versus access through the web browser versus web in Desktop Mode, I decided it was time to create one.  So, if you're looking to improve your experience with Google Drive on the IPad, I hope this PDF will come in handy.  I've included screen shots below, and you can access / download it here.


Monday, January 21, 2013

Boston Bruins I.C.E. School

While happily watching the first Bruins game of the season Saturday night, there were a few ads for the new Boston Bruins I.C.E. School. Curious, I hopped online and navigated my way to the I.C.E. School program website. It offers some pretty great FREE curriculum materials for grades K-8. There is an online form you must fill out in order to access the materials.

As you can see in the screen shot below, curriculum resources are sorted by  grade and subject. Sherwood teachers can find ELA, Math, and Science material while Oak teachers can access Math materials, many of which could also be used in 8th grade Science classes.

In addition to the core classes, there are also curriculum materials available for French, PE, and "Miscellaneous" materials that focus on teambuilding and school climate. Why should you consider the curriculum created by the Boston Bruins I.C.E. School? It makes learning fun and relevant, especially for students who are hockey fans!

Here is a sampling of the Bruins I.C.E. School curriculum...

Grade 6 ELA

Lesson 1:  Hockey -- The Basics
Lesson 2: The Bruins in Action
Lesson 3: Perspectives in Hockey
Lesson 4: Accuracy in Reporting
Lesson 5: MVP
Lesson 6: Bruins Hall of Fame

Grade 7 Math

Lesson 1: Rate of Speed 
Lesson 2: Reaction Time 
Lesson 3: Building a Stadium 
Lesson 4: Passing Angle 
Lesson 5: Goalie Angles 

Grade 8 Math

Lesson 1: Area and Volume of a Cylinder
Lesson 2: Using and Applying the Pythagorean Theorem
Lesson 3: Investigating patterns of association in bivariate data
Lesson 4: Investigating patterns of association in bivariate data
Lesson 5: Understanding the connections between proportional relationships 

French

Lesson 1:  Countries and provinces  (nationalities, languages)
Lesson 2:  Verb : “être”
Lesson 3:  Adjectives
Lesson 4:  Colors
Lesson 5:  -er verbs
Lesson 6:  Hockey terminology - nouns
Lesson 7:  Reading comprehension and Composition

Saturday, January 5, 2013

How to transfer photos and videos from your iPad

Despite all of the apps out there, one of the iPad's greatest features is its camera. Newer models have front and rear-facing cameras that let you take some pretty impressive photos and videos*. All of this media lives in the device's "camera roll" and can be shared with others through email, text messages, Facebook, and photo stream to name a few. Sometimes though, you may want to share many photos, or you may want to transfer all of the photos and videos on your iPad to your laptop. In order to do this, we need to get a little more creative.

*When I talk about "photos and videos", I am referring specifically to the pictures and video you take using the iPad's camera function. The steps below to do not apply to pictures and videos created with an app such as iMovie.


Apple makes it easy for people to sync their photos and videos on the iPad directly to their computer's photo library using iTunes. Unfortunately, this option will not work for you if you are using a school-issued iPad. Shrewsbury teachers are not allowed to plug their iPad into a computer because it will cause management problems. This is a necessary step to set up the syncing process. We must go to Plan B.


Apple's iCloud is a neat feature that lets you store your stuff online. It lets you access your music, documents, photos, calendars, contacts, and more from whatever device you are on. Once iCloud is set up, it automatically syncs things between your iPad, iPhone, and computers.

Take a photo with an iPad, and it will show up on your laptop.
Download a new app on an iPhone, and it will immediately download onto your iPad! Watch the video below for a better sense of how it works.


How to set up iCloud on different devices:

iPad, iPhone, and iPod touch:
http://www.apple.com/icloud/setup/ios.html

Mac laptop or desktop: 
http://www.apple.com/icloud/setup/mac.html

Windows PC:
http://www.apple.com/icloud/setup/pc.html


Dropbox is a free service that lets you sync files across all of your different devices. It is similar to Google Drive and used by a lot of people. I use it as a way of backing up my files and giving me access to my stuff from anywhere. It's much better in my opinion than backing things up to the school server because you can access files in Dropbox from any computer. 


Click on the links below to read some previous tech tips that pertain to Dropbox:


Battle of the cloud storage (April 24, 2012)

Dropbox introduced a new feature earlier this year for their iPad/iPhone app that lets users sync all of the photos and videos in the "camera roll" into their Dropbox account. It creates a new subfolder called "Camera Uploads" in your main Dropbox folder. The media gets synced each time you open the Dropbox iPad or iPhone app. 

In order for this to be really effective, you should have Dropbox installed on your iPad and your laptop. Personally, I do not like iPhoto very much and much prefer having my pictures end up in a Dropbox folder on my computer instead. 

I use Dropbox to sync pictures and video on both my iPad and iPhone so I have everything on my school laptop and home PC, Even if you use Dropbox for nothing other than syncing your photos, I think it's well worth it. The image to the right, for example, is a screen shot I just took of my iPhone. It quickly synced to my laptop, and I was able to post it here within thirty seconds.


Photosync ($1.99) is an app for the iPad/iPhone that lets you easily transfer photos and videos to and from your computer. It also lets you transfer between iOS devices, or you transfer to numerous possible "web services" including Dropbox, Google Drive, Facebook, Google Plus, Flickr, Picassa, etc. If you are looking to transfer files to your computer, there is a free utility you should download to make it easier.

Unlike iCloud and Dropbox, the syncing does not happen automatically. You choose whether to sync all files, just new files, or you can choose which photos and videos to sync. 

I have played around with this app to transfer some pictures and videos to Dropbox, Google Drive, and Flickr. Each time, the app was able to sync with my other accounts flawlessly. I had to log in to the other accounts and give this app permission to access my files.

Which option should you use?

There is no clear winner, but I have tried them all and prefer Dropbox. This could be because I was already a Dropbox user and comfortable with it. I like having everything in one spot so having all of my pictures in iCloud is not an appealing option for me. I do like iCloud for other things, just not syncing my photos.

Photosync is a nice "one size fits all" app if you like to transfer photos to numerous destinations. Like I said, I have used them all so if you are interested in trying any of these, let me know and I can help you get started. Also, if you know of any other ways to transfer photos and/or videos from your iPad, please  share them.

Tuesday, December 11, 2012

Looking for an easy way to collect digital work?

 Many teachers have been flirting with some form of digital work in their classrooms.  This opens up creative possibilities - instead of a traditional report, some kids may create a Glogster poster, others a Museum Box, perhaps a screen cast... the possibilities are virtually endless (pun intended)!

As great as this is, it also can open up a book keeping nightmare -- no more simple dropping of an assignment in a box -- they can be anywhere on the web.  One kid tells you it's posted on his wiki, another has hers in a dropbox... pretty soon you have no idea where half the items are, let alone a logical way to sit down and grade them while maintaining your sanity.

Enter the Assessment Collector.  (Thanks to Kern Kelly over at The Tech Curve - see his explanation for this handy creation here:  http://thetechcurve.blogspot.com/2012/04/managing-google-docs-in-classroom.html 

This is a handy little Google Form.  When a student goes to this link, here's what they see:

A simple form, where they enter their name, choose their period, and select the particular item they are turning in.

Once they do this, they copy and paste the link to whatever they have created.  Anything published on the web - or shared in a Google Drive - anything with a web address, can be turned in this way.

You adapt it as needed - add and remove new assignments when you need to (I allow students to submit work "for review" or "for a grade" depending on where we are in the process), so you can close a window when a deadline passes, and open a new one when needed.


How does it look on the teacher's end?  Well, it has a few simple features.  It operates through a Google Form, as I noted, so it's a tabbed spreadsheet when you look at it from the teacher's end.

When you open it, here's the first tab:
As you can see, it has basic directions right here.

Once on this page, you simply click Form -> edit form to change the items.

The form is brief and to the point.

Edit assignment options to change that pull down menu, and the period options to match your sections.


The next tab is the really helpful one - this is the Filter.


The two yellow boxes up top are pull-down menus - as students fill out the form, you can use this page to select a particular class group, and a particular assignment, so that you only see the group you wish to grade.

You then just click the link, open it in a new window, and score the assessment.


The 'entry' tab is where all the student responses go -- this is what the filter is looking at.  As each student submits information, it appears here.  I sort this sheet by period or last name before I start grading, so that I can record my student scores alphabetically once I view them through the filter.

I also added a tab for 'finished' - once I grade some papers, I go to the "Entry" tab, and cut the ones I've graded, then paste them into the finished tab.  I then delete the empty rows from the Entry sheet.  Why? This accomplishes two things:
1.  When I go back to the filter, I only see the items I have left to grade.
2.  I have one tab with a record of everything each kid has submitted.  I can sort it by name, and see which students submit work for review, which ones get everything in on time, etc.

Interested in trying this out?  Go here to visit the form and then make a copy into your own Google Drive: http://www.tinyurl.com/asstcoll

If you have any questions, or want to see a demo, let us know!

Per usual, you can revisit all of our tips at http://smstechtips.blogspot.com/

Have an interesting tech idea you'd like us to promote?  Send us an email!

Until next time,

Deremy


Saturday, November 24, 2012

Annotating PDF documents on the iPad

One of the biggest benefits to using iPads in the classroom is moving toward a paperless classroom. In order to do this, we must find an alternative to having students write on paper worksheets or other graphic organizers. One of the easiest ways to do this is to have students annotate a PDF (Portable Document Format), then save that revised version on their iPad.

In most classrooms it looks something like this: 

1. Teacher makes a PDF of the worksheet/handout/graphic organizer. This can  be done by scanning the paper copy and saving it as a PDF file. If the handout is made in Microsoft Word, the file can be saved as a PDF file. (All of my class handouts are converted in this way.)

2. The PDF handout is made available to students. This can be done in numerous ways. Read our blog post on iPad workflow for more information on how to do this.

3. The student uses the "Open in..." function on the iPad to open the PDF document in an a particular app that lets them annotate and save the document. The most popular app being used for this purpose is Notability.

However, unlike most people, I am not a huge fan Notability. I gave it a shot earlier in the year and quickly began the search for alternatives. Notability does have more bells and whistles compared to other apps. However, the most important features I need my students to have is the ability annotate text (highlight, underline, cross out, etc.) and add both "hand written" and text notes. I'm not saying Notability can't do these, it's just not as easy. So, two possible alternatives to check out are Adobe Reader and PDF Expert.

Alternatives to Notability...

Adobe Reader (Free)

Adobe now offers an Adobe Reader mobile app for Android and iOS devices. It looks and acts much like the desktop version. 

File Management: 
All annotated files are saved in your main "Documents" folder. You can create additional folders (for different subjects) and subfolders (different units?) for your documents. You can also sign up for an account at Acrobat.com that lets you sync files between different devices. 

Annotating: 
Press down on a word, and you have the option to copy, highlight, strikeout, underline, or define the word. Once you highlight, strikeout, or underline, you can then change the color and opacity of your mark. 

Adding notes: 
Press down on an empty spot, and you have the option to add a note, typed text, freehand, or a signature. The "note" creates a sticky note, but all other types of notes can then be modified. You can delete the note or change the thickness, color, and opacity. Also, when you press on it a second time, a text box is created that can easily be resized or moved anywhere on the page. 

Summary: 
I know this may not sound any easier than Notability, but I have about ten students with iPads this year who also found Notability difficult to use. I had them use the Adobe Reader app, and they like it much more. Again, they aren't doing anything fancy, just adding text to my science handouts.

PDF Expert ($9.99 but was on sale this week for $4.99)

I sent an email recently about Readdle having a sale for many of their apps. One of their apps, PDF Expert, is my absolute favorite app for editing PDFs. It has a lot of advanced features that justify the price.

File Management: 
Like Adobe Reader, files are saved in your "Documents", and you can create folders and subfolders. Files can be sorted by name, date, and size. PDF Expert has some pretty cool syncing features as well. ou can add servers that give you access to documents in Dropbox, Google Drive, Box, and more. There is also a two-way syncing feature so whatever changes you make in the app can be saved to your cloud storage account.  

Annotating: 
Press down on a word, and you have the same options as Adobe Reader, plus the option to leave a sticky note with your highlight. Once you highlight, strikeout, or underline, you can then change the color (lots of options) but not the opacity of your mark. 

Adding notes: 
Press down on an empty spot to have the same features as Adobe Reader. Additional options include a "stamp", image, or sound note. The stamp is digital stamp feature such as "Approved" or "Completed" which could come in handy for grading. The image note lets you add a picture using the iPad camera or Photo Library. The sound note is my favorite feature. Notability also has an audio feature at the top of the note, but PDF Expert creates an audio file anywhere on the page. How could this be handy? Imagine you have a student who is allowed to take tests orally, but with 30 kids in a class you just don't have time to sit down with them. You could have them take the test on an iPad and record their answers orally by leaving an audio note for each question. It also includes an impressive suite of drawing tools that includes lines, arrows, and shapes. You can also change the pen color, thickness, and opacity.   

Other features:
Another cool feature in PDF Expert is the ability to have multiple tabs open for different documents. This makes it much easier and quicker to go back and forth between documents.

Summary: 
I know $10 is a lot to shell out for an app, but it really is worth it. Obviously, the district is not going to pay for all students to have this so I envision this being used by teachers while students use Notability or Adobe Reader. If you would like to experiment with it on my iPad, just let me know!

Resources: 

Adobe Reader: Getting Started Guide

PDF Expert Guide


Thursday, November 1, 2012

Refine your Search (Engines)

This past week, we had the pleasure to attend MassCUE over at Gillette Stadium (it felt a bit odd to be there without a grill, lobsters, and other tailgate accessories, but that's not important here)...

So, over the next few weeks, we'll share some of our key learnings in these posts.

This week's topic: search engines.

For many of us, when we search it's a reflex movement towards Google, or perhaps Bing -- but these represent only a very small slice of the options available.  Depending on the task at hand, and your target group of students, there are a wide range of options available.  Here are a few (followed by a site where you can find all of the engines in one tidy spot).


Duck Duck Go has several things going for it, including:

  • it does not use cookies / track you - sites like Google use what's called a "filter bubble" - they build a profile of your tendencies, and give you search results based on what they know about your habits.  DDG gives a fresh search every time
  • The interface is clean - ad free.  


When you look at the results, there are a couple other cool features, too:
  • If the site has an icon, it appears next to the entry.
  • There are add-ons under the "More" menu - click on Goodies and you get math and science tools, specialized searches and helpful little items sorted by subjects.


Carrot2 is a nifty little "clustering engine."  Basically, it takes results and groups them into visual folders, which you can look at in several formats...


Results can be shown as a color wheel, with the size of the slice representing the number of links.

The little dots to the right represent each page in the results -- when you select a title, the corresponding dots darken, and summaries of their content are give to the right.


You can also choose what they call a "foam tree" - same concept as above, with the size of the box representing the relative number of hits for that item.


Note: right now, the site is flash based, meaning it won't work on IPad browsers (except for those that have a workaround - more on that in future posts)... but they are converting over to HTML 5.


This next tool - Twurdy -  is an interesting one (in spite of a name that sounds vaguely obscene) - it returns search results, color coded according to the required reading level.  It takes the site a little while to run its lexile algorithm, so be patient waiting for results, but the results can be well worth it...
  
As you can see, the entries are shaded different colors, which correspond to the color codes you see on the chart to the right.

This is a bit more specific than the results you get from one of my favorite search engines, which I detailed in an earlier post - instagrok.


Search Cube  is another interesting way to see results - it gives you little images of each site, on a cube you can rotate...


This can be very useful with images and videos, and also is kind of fun to spin around...
This last one is perhaps the most useful, from a teacher standpoint.  Put in a search term, and get results sorted by category - lesson plan, text book, quiz / test, etc.  Just go to http://www.goorulearning.org/ 


Each column is a different resource type - interactive activities, websites, tests, videos, lessons, slide shows... this can save a lot of time in planning - don't reinvent the wheel!

Looking for even more search engines?  Hop on over to this symbaloo site:  http://www.symbaloo.com/mix/learning2search - it has links to a couple dozen different ones, there's bound to be something you'll find useful.


Until next week!

Deremy

Monday, October 22, 2012

Finding great apps for your iPad without spending a lot of time and money


The Apple "App Store" has over 500,000 apps available for download, and this number is increasing every day. There are apps for science, reading, note taking, video editing, and basically anything else you can think of. As the saying goes, "There's an app for that." With so much stuff out there though, it can be very tough, not to mention time consuming, searching for apps that are beneficial and free (or very cheap). This tech tip is to share two valuable resources that have done all of the work for you.

AppAdvice


Appadvice.com is an EXCELLENT resource for iPhone/iPad apps.

You can search for apps in a few different ways: app reviews, app lists, app guides, and an app base.


App reviews: Read their reviews of newly-released apps.

App charts: Search through the App Store charts by category just like you would within the App Store itself.

App lists: One of the coolest features of this site...they handpick apps to fit your lifestyle. Find "apps to help you be green", "apps for car drivers", "apps to plan events", and so much more!

App guides: These guides are all "best of" apps for various topics. For each one, they break down the apps by rating: essential apps (the top 2-3), notable apps, decent apps, and other apps. Check out their appguide for best handwriting apps on the iPad.

App base: Browse new apps (free or paid) by category.

Apps Gone Free

Appadvice has also released a free iPad app called Apps Gone Free. Ann Gustafson brought this great little app to my attention! Each day, when you open the app, it lists about ten paid apps that are free for that one day only. Some usually cost 99 cents, but there have been some that usually cost around $5. Many of them are silly games, but once in a while you find a really interesting app that's worth checking out. 

Edtechteacher: The iPad as...

Edtechteacher.org offers a lot of teacher professional development related to technology and the use of iPads in the classroom. They helped to coordinate the Shrewsbury Summer Institute and are currently offering the T21 program at Oak. 

They are also hosting the iPad Summit 2012 on November 7-8. 

The Edtechteacher website has a lot to offer for teachers. One of their best resources though is their "The iPad as..." page. They categorize iPad apps by learning objectives, as seen in the screen shot below. 


For each iPad learning objective, they list recommended apps, give a brief description, and rate its usefulness and ease of use. A site like this can be really handy because apps are always improving. Just when you thought you found the perfect app, another one comes along that's even better. We don't have time to keep track of all of these apps, and we don't have to. Edtechteacher will update these apps as newer, better ones come along. Below is an example of some apps they recommend for recording and editing video on the iPad. 


Tuesday, October 16, 2012

Track Essential Skills with Class Dojo

At the start of the year, I searched for an easy way to track those essential skills in my classroom.  In past years, I kept different grade sheets - one for class involvement, one for homework, one for organization / preparedness, and kept all of these on a clipboard.  Then I moved to a grid, where I could jot quick notes on each student, when needed.  Both of these worked ok, but it was a lot of paperwork, and it slowed down both the recording and the grading.  Given that I carry an IPad around my classroom, I figured there had to be a better way.  Enter Sandy Wallach, who introduced me to this great tool, which is saving me a ton of time (and paper!):

Put simply, this little tool allows you to track any traits - positive or negative - at the touch of a button on your IPad.  You can then add comments, view or print reports, and even share reports with students or parents from the website.

Here's how it works.
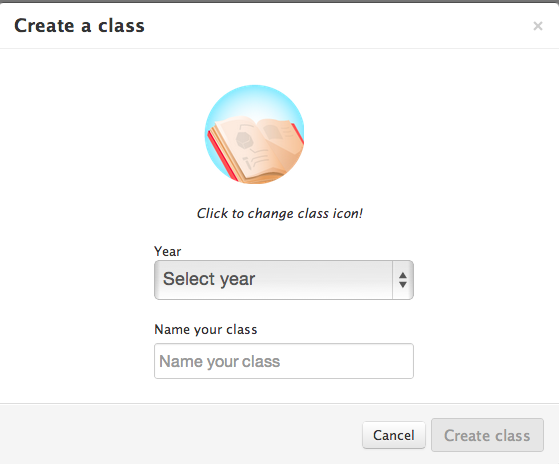
First, go to classdojo.com to set up your free account.  Once you have done this, you can create your classes quickly and easily: click "create a class, select the grade level from the pull down menu, and name the class.

Adding students to the class is as easy as copy and pasting a list from Excel or Word straight into the next screen... you can then populate the names with cute little monster icons.  For some reason, I find this satisfying.
Once you've got your class list set, you're ready to set up the traits you'll be tracking. 

 All you need to do is click the "behaviors" tab, then select either "positive" or "negative."  You can then click on any trait to change both the descriptor and the image.  If you need to add more traits, just click "add your own."  When you're done, hit "save and close."
*Tip: I write down my trait list when I set up my first class - that way, I can reference the list when I go to set up my other classes.
*some suggested traits: I use this to track class involvement - volunteers, answers questions, uses evidence, insightful, leadership, etc.  On the negative side, I track: locker trips, organization, being off task, late to class, not using planner, etc.  

Once your classes are set up, you're ready to use this on your IPad.

Start by going to the app store and search for "class dojo."  Download it.  


When you start the app the first time, you'll log in using the same information you used on the website.  You should see a screen that looks like this.  Simply click the class you want to use. 
This will bring you to your class page.  Tracking a trait is a simple 2-click process: first, click the student name or names that you want to tag.  This will open a pull-up menu from the bottom of the screen, listing positive and negative traits.  Tap the one that applies.  This automatically records the entry on the website.
How do you use the information?  Go back to the website (from an IPad or laptop) and you can pull student reports, which give you a pie chart of positives and negatives, along with a record of days and times that these were recorded.  You can view traits for a set period of time as well - choose a week, a month, or the entire class time.

Another nice feature is that, from this screen, you can add comments to any of the traits you've recorded.  This can be handy when meeting with the student, the parents, or just for your own information...
If you'd like, you can also email the reports to parents and / or students, give families access to their child's information online, and share it with colleagues.

Overall, this tool has simplified classroom record keeping, giving me more information in less time -- and keeping it all organized.

Need a bit more information, or just prefer video to text?  This youtube video walks you through the basics of the site.  (Go to our blog to see it - it can't embed in an email!)


Per usual, let us know if you have any questions, and go to our blog site for all of our tips, and access to the embedded videos and content.

D&J